Guest Feature: Crochet a Yoshi Egg

Amigurumi Projects, Gamer Crafts, Guest Features


Yoshi Egg

This adorable crocheted Yoshi Egg tutorial comes from my fellow Canadians at Girls on GamesThis pattern is for the egg, not the Yoshi (he’s the Amiibo).

From time to time I receive questions about how to get started with knitting or crochet, and my advice is generally 1) ask a friend who crafts or join a community group and 2) Google and YouTube have tutorials on pretty much anything you can imagine. But this is even better! You get step-by-step instructions from Princess Peach herself, aka cosplayer Sophie Jouin, who also created the free pattern :)

Screen Shot 2015-11-17 at 2.13.15 PM

If you’d like to make a Yoshi Egg, check out the video by Girls on Games, and the pattern posted on Nintendo’s website.

If you’d like me to feature your project on DIY Geekery, you can contact me by email at diygeekery@gmail.com. Happy making :)

Guest Feature: Farscape Moya Starship

Amigurumi Projects, Guest Features


Today’s guest feature is a lovely free pattern for the organic starship Moya from Farscape, courtesy of Jana Whitley.

Here it is in all its glory… as you know I have a soft spot for cuddly starships.

Moya 1 Moya 2

Gorgeous! She publishes all sorts of geeky patterns on her Ravelry page: lots of delightful Disney with a splash of Marvel, Potter, LOTR… and Farscape of course. My favourite pattern (not free, but quite reasonable at $2.99) is this squee-worthy Black Mage from Final Fantasy:

Black Mage

Thanks for sharing Jana!


Octopus Amigurumi

Amigurumi Projects, For Science!

Just in time for the holidays, it’s… an octopus. Merry Octopusmas?

Octopus 2

I had scrap yarn left over from making these cozy legwarmers and decided to play around and come up with a new pattern. I’ve made octopi before but all the patterns I could find online were chibi… not that there’s anything wrong with that.

Octopus 4

What you’ll need:

  • worsted weight yarn in whatever colour you want your octopus to be (Caron Simply Soft in Pagoda used here)
  • contrasting colour for suction cups, if you want to make suction cups (I used scrap pink fuzzy yarn of mysterious provenance)
  • size F/3.75mm crochet hook
  • 15 mm safety eyes
  • yarn needle

The octopus is made in 2 pieces: top and bottom, which are sandwiched together with stuffing in the middle. The top and bottom of the legs don’t match perfectly: this is deliberate and makes them want to curl.

Abbreviations: stitches used are single crochet (sc), increase (inc), invisible decrease (invdec), slip stitch (sl st), chain (ch), and half double crochet (hdc).

First make the top, starting with the head, working in the round:

  • 1) sc x 6 in magic ring (6)
  • 2) inc x 6 (12)
  • 3) (inc, sc) x 6 (18)
  • 4) (inc, sc x 2) x 6 (24)
  • 5) (inc, sc x 3) x 6 (30)
  • 6) (inc, sc x 4) x 6 (36)
  • 7-11) sc around x 5 rounds (36)
  • 12) (invdec, sc x 4) x 6 (30)
  • 13) sc around x 1 round (30)
  • 14) (invdec, sc x 3) x 6 (24)
  • 15-16) sc around x 2 rounds (24)
  • 17) sc x 8, hdc x 8, sc x 8 (24)
    • these steps make the head angled instead of straight on
  • 18) sc x 6, hdc x 12, sc x 6 (24)
  • 19) sc x 4, hdc x 16, sl st x 4 (24)
  • 20-22) sl st x 4, hdc x 16, sl st x 4 for 3 rounds (24)
  • 23) sl st x 4, hdc x 16, sc x 4 (24)
  • 24) (sc x 2, inc) x 8 (32)
    • these steps make the tops of the 8 legs rounded
  • 25) (sc x 2, inc x 2) x 8 (48)
  • 26) (sc x 4, inc x 2) x 8 (64)
  • 27) (sc x 6, inc x 2) x 8 (80)
  • 28) (sc x 8, inc x 2) x 8 (96)

You have a head with a fluttery border. Now make legs, one at a time, working back and forth instead of in the round:

  • sc x 6 (aligns you to start the first leg) then…
  • ***sc x12
  • turn, (don’t ch, skip 1st sc), sc x 11
  • turn (don’t ch, skip 1st sc), sc x 10
  • ch 1, turn, sc x10 for 2 rows
  • turn (don’t ch, skip 1st sc), sc x 9
  • ch 1, turn, sc x 9
  • turn (don’t ch, skip 1st sc), sc x 8
  • ch 1, turn, sc x 8
  • turn (don’t ch, skip 1st sc), sc x 7
  • ch 1, turn, sc x 7
  • turn (don’t ch, skip 1st sc), sc x 6
  • ch 1, turn, sc x 6 for 3 rows
  • turn (don’t ch, skip 1st sc), sc x 5
  • ch 1, turn, sc x 5
  • turn (don’t ch, skip 1st sc), sc x 4
  • ch 1, turn, sc x 4
  • turn (don’t ch, skip 1st sc), sc x 3
  • ch 1, turn, sc x 3 for 7 rows
  • turn (don’t ch, skip 1st sc), sc x 2
  • ch 1, turn, sc x2
  • turn (don’t ch, skip 1st sc), sc x 1, FO and leave tail***

Octopus 1 leg


To make 7 more legs, flip your octopus over. Start with a sl st on the left side of previous leg (on underside), then repeat the leg pattern above from *** to ***. The top half is done.

Octopus new leg

Now start a new piece and make the bottom half, starting with the centre, working in the round:

  • 1) 6 sc in magic ring (optional: use a contrasting colour for this round to make a mouth)
  • 2) change to your regular colour, (inc) x 6 (12)
  • 3) (inc, sc) x 6 (18)
  • 4) (inc, sc x 2) x 6 (24)
  • 5) (inc, sc x 3) x 6 (30)
  • 6) (inc, sc x 4) x 6 (36)
  • 7) (inc, sc x 5) x 6 (42)
  • 8) (inc, sc x 6) x 6 (48)
  • 9) (inc, sc x 7) x 6 (54)

Octopus bottom

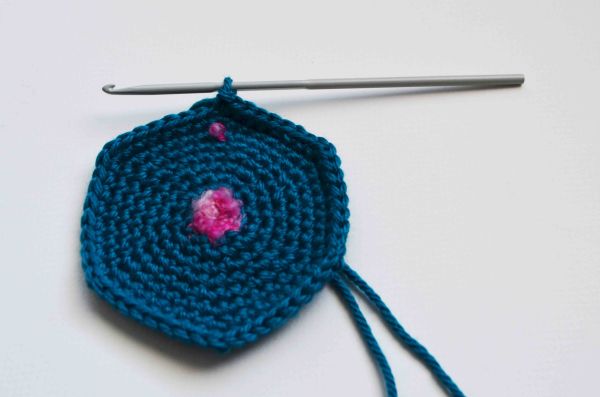
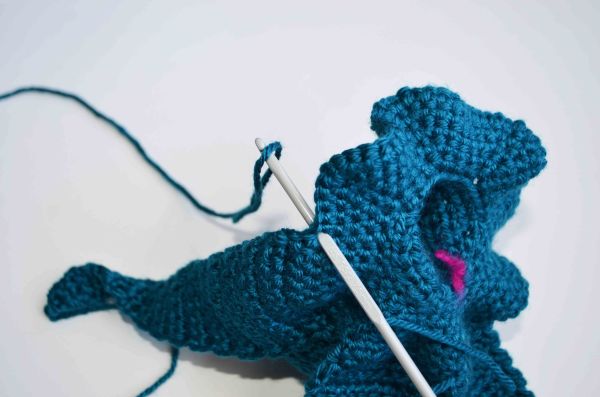
You’ll have a hexagon with a mouth in the middle. Make the bottom of the first leg:

  • inc, sc x 6, inc along edge of bottom piece
  • ch 1, turn, sc x 8 (8) for 3 rows
  • turn, (don’t ch, skip 1st sc), sc x 7 (7)
  • ch 1, turn, sc x 7 (7)
  • turn, (don’t ch, skip 1st sc), sc x 6 (6)
  • ch 1, turn, sc x 6 (6)
  • turn, (don’t ch, skip 1st sc), sc x 5 (5))
  • ch 1, turn, sc x 5 (5)
  • turn, (don’t ch, skip 1st sc), sc x 4 (4)
  • ch 1, turn, sc x 4 (4)
  • turn, (don’t ch, skip 1st sc), sc x 3 (3)
  • ch 1, turn, sc x 3 (3) for 7 rows
  • turn, (don’t ch, skip 1st sc), sc x 2 (2)
  • ch 1, turn, sc x 2 (2) for 5 rows
  • turn, (don’t ch, skip 1st sc), sc x 1 (1)
  • ch 1, turn, sc x 1 (1) for 3 rows, FO and leave tail

Repeat this 7 more times around until you have 8 leg-bottoms.

You now have 2 pieces:

Octopus pieces

Attach the safety eyes. If you’re making suction cups, sew them to the bottom of the legs before you sew the octopus together. Suction cups are just 6 sc in a magic ring for the most proximal (then 5 sc, 4 sc, 3 sc for smaller ones), and french knots for the tiniest ones at the ends. Here’s a video tutorial for french knots if you’d like one.

Now all you need to do is sew the 2 pieces together, stuffing as you go. I’d suggest attaching the tips of the legs together first and working your way in (it’s easier to stuff that way).

My Neighbor Totoro Amigurumi

Amigurumi Projects, Anime and Comics

My latest project has nothing to do with crafting: you may have *ahem* noticed the shiny new blog format. The home page now shows patterns and tutorials, and the blog is visually decluttered.

Please bear with me as I transition the content: I promise none of the links will take you to goatse. I hope.

Here is a blue Totoro:

Totoro square

This is not my pattern, but I’ve made it twice and it’s wonderful. Lucyravenscar’s pattern can be found here, and she also has free patterns for grey (big) and white (tiny) Totoros.

Baby Panda Amigurumi Pattern

Amigurumi Projects

Here is a free pattern for a baby panda amigurumi: this isn’t particularly geeky, but it’s cute and easy to make, and I don’t want to start a whole new blog just for baby pandas. Or do I…

I made him for my friend’s baby boy: he loves black and white patterns and the ears are nice and chewable now that he’s teething. Just use non-toxic, extra-soft yarn and avoid choking hazards (like buttons for eyes) if you’re making one for a tiny human.

About 10″ long using a size F/3.75mm hook and worsted weight yarn.

Pictures first, and pattern below…

Panda square

Panda 3

Panda 2


You’ll need:

  • black and white yarn (worsted weight used here)
  • size F/3.75mm crochet hook
  • stuffing
  • black felt for eyes and nose
  • black and white embroidery thread for face details
  • yarn needle to sew pieces together

Stitches used are single crochet (sc), increase (inc), invisible decrease (inv dec), and finish off (FO)… simple shapes only

Body

Start with white yarn

  • 1) sc x 6 in magic ring (6)
  • 2) inc x 6 (12)
  • 3) *sc, inc* x 6 (18)
  • 4) *sc x 2, inc* x 6 (24)
  • 5) *sc x 3, inc* x 6 (30)
  • 6) *sc x 4, inc* x 6 (36)
  • 7) *sc x 5, inc* x 6 (42)
  • 8) *sc x 6, inc* x 6 (48)
  • 9) *sc x 7, inc* x 6 (54)
  • 10) *sc x 8, inc* x 6 (60)
  • 11) *sc x 9, inc* x 6 (66)
  • 12-21) sc around for 10 rounds (66)
  • 22-31) switch to black yarn, sc around for 10 rounds (66)
  • 32-43) switch to white yarn, sc around for 12 rounds (66)
  • 44) *sc x 9, inv dec* x 6 (60)… start stuffing if you haven’t already and keep stuffing as you close
  • 45) *sc x 8, inv dec* x 6 (54)
  • 46) *sc x 7, inv dec* x 6 (48)
  • 47) *sc x 6, inv dec* x 6 (42)
  • 48) *sc x 5, inv dec* x 6 (36)
  • 49) *sc x 4, inv dec* x 6 (30)
  • 50) *sc x 3, inv dec* x 6 (24)
  • 51) *sc x 2, inv dec* x 6 (18)
  • 52) *sc, inv dec* x 6 (12)
  • 53) inv dec around until hole is small enough to be covered by flap, FO and weave in tail

Legs (make 4)

Black yarn

  • 1) sc x 6 in magic ring (6)
  • 2) *sc, inc* x 6 (12)
  • 3) *sc x 2, inc* x 6 (18)
  • 4) *sc, x 3, inc* x 6 (24)
  • 5-7) sc around for 3 rounds (24)
  • 8) *sc x 3, inv dec* x 6 (18)
  • 9) sc around x 1 round (18), FO and keep long tail to sew to body, stuff before attaching

Ears (make 2)

Black yarn

  • 1) sc x 6 in magic ring (6)
  • 2) *sc, inc* x 6 (12)
  • 3) *sc x 2, inc* x 6 (18)
  • 4) *sc, x 3, inc* x 6 (24)
  • 5) *sc x 4, inc* x 6 (30)
  • 6-9) sc around x 4 rounds (30), FO and keep long tail to sew to body

Now each ear will look like a hemisphere. Fold it in half to make a quarter-sphere (this makes a thick ear that will keep its shape… no stuffing between the layers). When you sew it on, maintain the curve of the base to keep the quarter-sphere ear shape (see the 2nd photo above).

Tail

Black yarn

  • 1) sc x 6 in magic ring (6)
  • 2) *sc, inc* x 6 (12)
  • 3) *sc x 2, inc* x 6 (18)
  • 4) *sc, x 3, inc* x 6 (24)
  • 5) *sc x 4, inc* x 6 (30)
  • 6-8) *sc around for 3 rounds (30)
  • 9) *sc x 4, inv dec* x 6 (24), FO and keep long tail to sew to body, stuff before attaching

Assembly

Sew the ears, feet, and tail to the body. Make the face however you like: I cut out ovals of black felt for the eyes and add details with embroidery thread before sewing them on. I cut out a smaller oval of black felt for the nose and added a mouth with embroidery thread.

You’re done!  Or you could find another way to get a baby panda…

china-panda-researchers-4

Skull Pincushion (Amigurumi Pattern)

Amigurumi Projects

I’ve been meaning to crochet a skull for some time, but haven’t gotten around to finessing the anatomic details of a larger version. This mini skull is a simple pattern, perfect for all your goth sewing needs. It made a perfect replacement for the boring fabric-store tomato I’ve been using as a pincushion.  See?

Skull pincushion 3

More views:skull side view Skull top view skull bottom view skull over viewMaking this little pin-head is quick and easy, and suitable for beginners. Stitches used are single crochet (sc), increase (inc), invisible decrease (invdec), finish off (FO).

You’ll need:

  • white or off-white yarn (I used Red Heart Super-Saver cheapo yarn, worsted weight)
  • size F/3.75mm crochet hook
  • stuffing
  • black embroidery thread for teeth and/or cranial sutures
  • safety eyes (or buttons, or felt…) 10mm used here
  • small piece of black felt for bottom (or just crochet the bottom closed if you’d rather)

Pattern:

  • 1) sc x 6 in magic ring (6)
  • 2) inc x 6 (12)
  • 3) (sc, inc) x 6 (18)
  • 4) (sc x 2, inc) x 6 (24)
  • 5-8) sc around x 4 rounds (24)
  • 9) (sc x 2, invdec) x 3, sc x 12 (21)… this makes the front flat and the back of the skull rounded
  • 10) (sc, invdec) x 3, sc x 12 (18)
  • 11) ch 1, turn, sc x 10 to make teeth

Now add eyes, stuff, and use embroidery thread to make teeth and/or cranial sutures, or add any details you’d like. This would look great as a sugar skull too. Cut a small piece of black felt and sew it into the opening at the bottom.

Lying Cat Amigurumi Pattern (from Saga)

Amigurumi Projects, Anime and Comics

What’s Saga, you ask?  Stop reading my blog right this minute and go check it out at your local comic shop… if you like breathtaking art and mind-blowing stories, that is.  I was late to discover the series, but the minute I did I started work on my own Lying Cat.

Lying cat saga panelOkay, maybe it was a few minutes later.

Lying cat lyingFine, it took me a few hours, but look how she turned out!

Lying cat closeup

Lying cat front

Lying cat back

Here’s the pattern to make her: I might make the head bigger if I make another one.  Note that the mottled blue yarn and gold yarn are bulky weight and the gray yarn is worsted weight… that’s just what I happened to have in my stash, not a conspiracy to make her more difficult to make.  If this is confusing, just use worsted weight and a size F/3.75mm hook for everything and you’ll end up with a proportional but smaller Lying Cat.  As shown, she measures 15cm/6″ nose-to-rump and 25cm/10″ nose-to-tail.

Stiches used include single crochet (sc), half-double crochet (hdc), increase (inc), invisible decrease (invdec), and slip stitch (sl st).  I don’t own Saga or Lying Cat, so please feel free to use and share the pattern, but don’t sell it or the amigurumi.

What you’ll need:

  • yarn in blue, grey, and gold/yellow
  • black felt
  • needle and black thread to attach felt
  • yarn needle to sew pieces together
  • wire to make her limbs and tail posable (optional… omit this if anyone might be putting her in their mouth)

Head/body:

  • bulky mottled blue yarn, size H/5.00mm hook, work in the round, stuff as you go
  • 1) 4 sc in magic ring (4)
  • 2) sc x 4 (4)
  • 3) inc, sc x 3 (5)
  • 4) inc x 2, sc x 3 (7)
  • 5) sc x 7 (7)
  • 6) sc x 3, hdc x 4 (7)
  • 7) sl st x 3, hdc x 4 (7)
  • 8-11) sc around for 4 rounds (7)
  • 12) sc x 3, *hdc x 2 in next sc* x 2, sc x 2 (9)
  • 13) sc x 3, hdc x 4, sc x 2 (9)
  • 14-18) sc around x 5 rounds (9)
  • 19) sc, hdc x 4, sc x 4 (9)
  • 20-21) sc around x 2 rounds (9)
  • 22) *sc, invdec* x 3 (6)
  • 23) invdec x 3 (3)
  • 24…) sc around (3) until tail is long enough (I made it approximately 10cm/4″ long)… thread a wire or pipecleaner into the tail before closing it off, if you want to make it posable

Front legs (make 2):

  • bulky mottled blue yarn, size H/5.00mm hook, work in the round, don’t stuff
  • 1) 4 sc in magic ring (4)
  • 2-7) sc around x 6 rounds (4)
  • 8) *hdc x 2 in next sc* x 2, sc, FO and leave tail to sew to body

Back legs (make 2):

  • bulky mottled blue yarn, size H/5.00mm hook, work in the round, don’t stuff
  • 1) 4 sc in magic ring (4)
  • 2-5) sc around x 4 rounds (4)
  • 6-7) hdc x 2, sc x 2 for 2 rounds (4)… this makes the legs bend
  • 8) sc around (4)
  • side 1: 9) *hdc x 2 in next sc* x 2, sc x 2 (6)
  • 10) *hdc x 2 in next hdc* x 2, sl st, FO and leave tail to sew to body
  • side 2: 9) *sc x 2, *hdc x 2 in next sc* x 2 (6)
  • 10) sc x 2, *hdc x 2 in next hdc* x 2, sl st, FO and leave tail to sew to body

Ears (make 2):

  • bulky mottled blue yarn, size H/5.00mm hook, worked in rows
  • 1) ch 4
  • 2) turn, skip 1st ch, sc x 3 (3)
  • 3) turn, skip 1st sc, sc x 2 (2)
  • 4) ch 1, turn, sc x 2 (2)
  • 5) turn, skip 1st sc, sc (1), FO and leave tail to sew to head

Gray back thingy:

  • gray yarn, size F/3.75mm hook, worked in rows
  • 1) ch 7
  • 2) turn, skip 1st 2 ch, hdc x 5 (5)
  • 3) ch 2, turn, hdc x 5 in back posts only (5)
  • 4) repeat row 3 until it’s long enough to cover the back, FO and leave tail to sew to body
  • now take gold/yellow yarn, work around the border of the gray piece… alternate sl st, ch 2, sl st in 1st ch, sl st around to make the fringe

Collar and belt:

  • chain of gold/yellow yarn, leave tail to sew to body

Assembly:

  • sew limbs to body (add wires inside front and back legs if you like)
  • sew back thingy, gold collar, and gold belt to body
  • cut out triangles of black felt and sew to ears, then sew ears to head
  • cut out a small cat-nose-shaped piece of black felt and sew to head
  • use gold/yellow yarn to make eyes, then use black thread to add detail to eyes and mouth area

You’re done!  Now go wait patiently for the next issue of Saga.

Lyingcat comic 2

Right.  Impatiently, then.

World’s Tiniest Batman Costume (Crochet Baby Beanie)

Geek Fashion

Warning: dressing your baby up as Batman is ridiculously cute and may make your head explode.

In honour of my new baby nephew, I made a pattern for a Batman baby beanie.  It’s quick to crochet: I made it in a few hours while visiting in the hospital, and that’s taking into account figuring out how to crochet a Bat-symbol.  The photos aren’t great: I just held up the hat in the hospital window and took a hand-selfie (my nephew is much cuter than my hand, but I didn’t want to put his photo all over teh Interwebs.)

If you’re going for full Bat-awesomeness, make the hat with ears:
Batman baby beanie with earsOr just make the beanie and Bat-symbol for a toned-down version (just an in-progess shot… of course I made Bat-ears):

Batman baby beanie no ears

What you’ll need:

  • baby-soft yarn in black and yellow (I used Caron Simply Soft, worsted weight)
  • size G/4.25mm crochet hook
  • yarn needle
  • a baby

Step 1: Make a beanie

You can use whatever pattern you like.  Use black yarn.  I’ve written up the pattern I made, but since the lil’ guy was born early you’ll probably want to make it bigger for a full-term newborn.  Stitches used are double crochet (dc), front post double crochet (fpdc), and back post double crochet (bpdc).  If you’re not familiar with fpdc and bpdc, these stitches are a great addition to your bag of tricks and will let you make ribs, cables, and all sorts of neat effects.  Here they’re used to make a stretchy ribbed border to hold the hat on.

  1. 8 dc in magic ring (8)
  2. ch 2, then 2 dc in each dc x 8, sl st into 1st dc of row to close circle (16)
  3. ch 2, then *dc, 2dc in next dc* x 8, sl st into 1st dc of row (24)
  4. ch 2, then *dc x 2, 2dc in next dc* x 8, sl st into 1st dc of row (32)
  5. if you’re going to make the hat bigger, keep increasing in this row (or start with more than 8 dc in your initial magic ring), otherwise ch 2 and dc around, sl st into 1st dc of row (32)
  6. ch 2, dc around, sl st into 1st dc of row (32)
  7. ch 2, dc around, sl st into 1st dc of row (32)
  8. ch 2, dc around, sl st into 1st dc of row (32)
  9. keep going with dc around rows if your hat isn’t long enough, otherwise ch 2, *bpdc, fpdc* x 16, sl st into 1st bpdc of row (32)
  10. ch 2, *bpdc, fpdc* x 16, sl st into 1st bpdc of row (32) (note that each bpdc should go into a bpdc, and each fpdc should go into a fpdc… this makes ribs)
  11. ch 2, *bpdc, fpdc* x 16, sl st into 1st bpdc of row (32)
  12. FO and weave in tail

Step 2: Make a Bat-symbol

Chain 30 with yellow yarn.  St st into the 1st chain to make a loop, and go around as shown in the picture.  Slip stitch into each chain around (little circles), with exceptions shown in the drawing (each group of stitches described goes into a single chain).  Leave a long tail and use it to sew the Bat-symbol onto the hat.

Bat symbol crochet

Bat-symbol

Step 3 (optional): Make Bat-ears

Use black yarn, make 2.  To quote my brother-in-law, these are more Michael Keaton than Adam West.  Feel free to adjust according to your favourite era of Bat-costume :)

  1. 3 sc in magic ring (3)
  2. sc around (3)
  3. inc, sc x 2 (4)
  4. sc around (4)
  5. inc, sc x 3 (5)
  6. sc around (5)
  7. inc, sc x 4 (6)
  8. sc around (6)
  9. *inc, sc x 2* x 2 (8)
  10. sc around (8)
  11. *inc, sc x 3* x 2 (10)
  12. sc around (10)
  13. *inc, sc x 4* x 2 (12)
  14. sc around (12)
  15. hdc, dc x 3, hdc x 3, sl st, FO and leave long tail to sew to hat (this makes one side longer so they fit on the side of the hat)

Squish the ears flat and sew to the sides of the hat.  Nana nana nana Baby Batman!!!  (Or Batgirl!!!)

Amigurumi Ninjas

Amigurumi Projects

If you’re in need of an amigurumi ninja pattern, you’re in luck.  I made three.  No, this isn’t meant to be overcompensation for my pirate eyepatch crochet.  Ninjas FTW.  Sorry pirates.  Here are three ninjas: all of the patterns are explained below:

DIYgeekery three ninjasThat’s one mini ninja, one tall ninja, and one ninja bunny.  I should explain: I have a hard time sitting still when I travel, so I bring along yarn and crochet hooks.  No knitting needles ever since some airports (ahem USA) have decided that knitting needles count as weapons.  Although if I were actually a ninja, I suppose they could be.  Maybe if I stopped making ninjas in the airport, security would let my knitting needles through.

For any of these, you’ll need:

  • worsted weight yarn in black (and red if you want to make a belt)
  • size F/3.75mm crochet hook
  • stuffing
  • felt for face and eyes
  • needle and thread to sew on face and eyes (or just glue them on)

Stitches used include single crochet (sc), increase (inc), slip stitch (sl st), and invisible decrease (invdec): these patterns are all quick and easy and suitable for beginners.

Mini ninja:

DIYgeekery mini ninja

Stands approximately 7cm/2.5″ tall, all pieces work in the round with black yarn.

Head/body:

  • 1) 6 sc in magic ring (6)
  • 2) inc x 6 (12)
  • 3) *sc, inc* x 6 (18)
  • 4) *sc x 2, inc* x 6 (24)
  • 5-14) sc around for 10 rounds (24)
  • 15) *sc x 2, invdec* x 6 (18)
  • 16) *sc, invdec* x 6 (12), then stuff
  • 17) invdec around until flap is small enough to cover the hole, sl st, finish off and weave in end

Hands:

  • 1) sc x 4 in magic ring (4)
  • 2) *sc, inc* x 2 (6)
  • 3) sc around (6)
  • 4) sl st, finish off and use end to sew to body

Feet:

  • 1) sc x 4 in magic ring (4)
  • 2) inc x 4 (8)
  • 3) sc around (8)
  • 4) sl st, finish off and use end to sew to body

Ninja bunny:

Ninja bunny

As you may have noticed, this is just the mini ninja with bunny ears.  It’s no Usagi Yojimbo, but I think it’s cute (and I had a limited supply of yarn colours with me and time to kill).  Wonky pink bunny eyes are optional.  Stands approximately 10cm/4″ tall with ears.  Make the mini ninja as above, then add:

Ears:

  • 1) sc x 4 in magic ring (4)
  • 2) inc x 4 (8)
  • 3) sc around (8)
  • 4) *sc x 2, invdec x 2* (6)
  • 5-9) sc around for 5 rounds (6), then sl st, finish off and use ends to sew to top of head, pinching the ears flat to make them look more like bunny ears

Tall ninja:

DIYgeekery tall ninjaStands approximately 15cm/6″ high.  This guy is made using the basic humanoid pattern, except I only increased the body to 18 sc around to make his head seem larger.  The belt was ch 40 in red yarn, tied in a double knot at the waist.

I’ve also figured out how to work a DNA double-helix into a 2D crochet pattern, but I’m not done that project yet.  Pattern coming as soon as I manage to finish it :P

Angry Birds Green Pig – Ornament Sized

Amigurumi Projects, Gamer Crafts

Green pig Christmas ornament 2

I’ve been busy making Christmas presents for many of the folks on my list – I’d originally planned to give handmade gifts to everyone but unless I find a way to reverse the space-time continuum that simply won’t happen.  I haven’t posted for a while since it wouldn’t be much of a surprise to see your gift online before you receive it, but I’ll put up a few things during the holidays :)

However… this little Green Pig ornament from Angry Birds has already found its new home, so I can post the pattern!  There are a few great free patterns online for Pigs already but they’re more in the 10cm or larger range: this little guy is only 3-4 cm high, perfect for hanging on a Christmas tree (or anywhere else you like).

Green pig Christmas ornament 3

BTW I don’t own Angry Birds, so please don’t sell these or the pattern.

What you’ll need:

  • green yarn (worsted weight)
  • size F/3.75mm crochet hook
  • stuffing
  • black felt for nostrils
  • googly eyes (or more felt)
  • glue (or needle and thread) to attach eyes and nostrils

Head/Body (where is his body anyway?)

  • 1) ch 4
  • 2) turn, sc x 2, 3 sc in last ch (work around the corner to the other side of the chain), sc x 2 in the other side of the ch, 3 sc in last ch (now you’re back where you started, and have an oval shape) (10)
  • 3) *sc, inc* x 5 (15)
  • 4) *sc x 2, inc* x 5 (20)
  • 5) *sc x 3, inc* x 5 (25)
  • 6-9) sc around for 4 rounds (25)
  • 10) *sc x 3, invdec* x 5 (20)
  • 11) *sc x 2, invdec* x 5 (15)
  • 12) *sc, invdec* x 5 (10)… now add stuffing
  • 13) invdec around until flap covers hole, FO and weave in tail

Ears (make 2)

  • 1) ch 4
  • 2) turn, hdc, dc, hdc, then FO and use tail to sew ear to head

Nose

  • 8 sc in magic ring, then FO and use tail to sew nose to head, squishing it a bit to make it oval

Now glue/sew on eyes and nostrils, and add a loop of yarn to the top of its head if you’re making an ornament to hang.  You can pull a loop of yarn loose on the bottom of his nose to make a little mouth (see picture).  Quick, easy and cute :)